
TL;DR
Moving your rig into a closet or another room is the most effective noise reduction. Combining strategic placement with targeted dampening and ventilation makes a quiet, efficient setup that doesn’t need endless foam panels.
Ever wonder why your closet rig still sounds echo-y or leaks noise? The secret isn’t just foam or panels. It’s about where you place things, how you treat the space, and most importantly, how you manage heat and sound transmission.
This guide reveals the real game-changers: moving your gear out of your main workspace, understanding the difference between dampening and soundproofing, and optimizing placement for both sound quality and noise control. If you’re tired of noisy rigs disrupting your work or recordings, read on — your quiet space is closer than you think. Learn more about acoustic treatment setup.
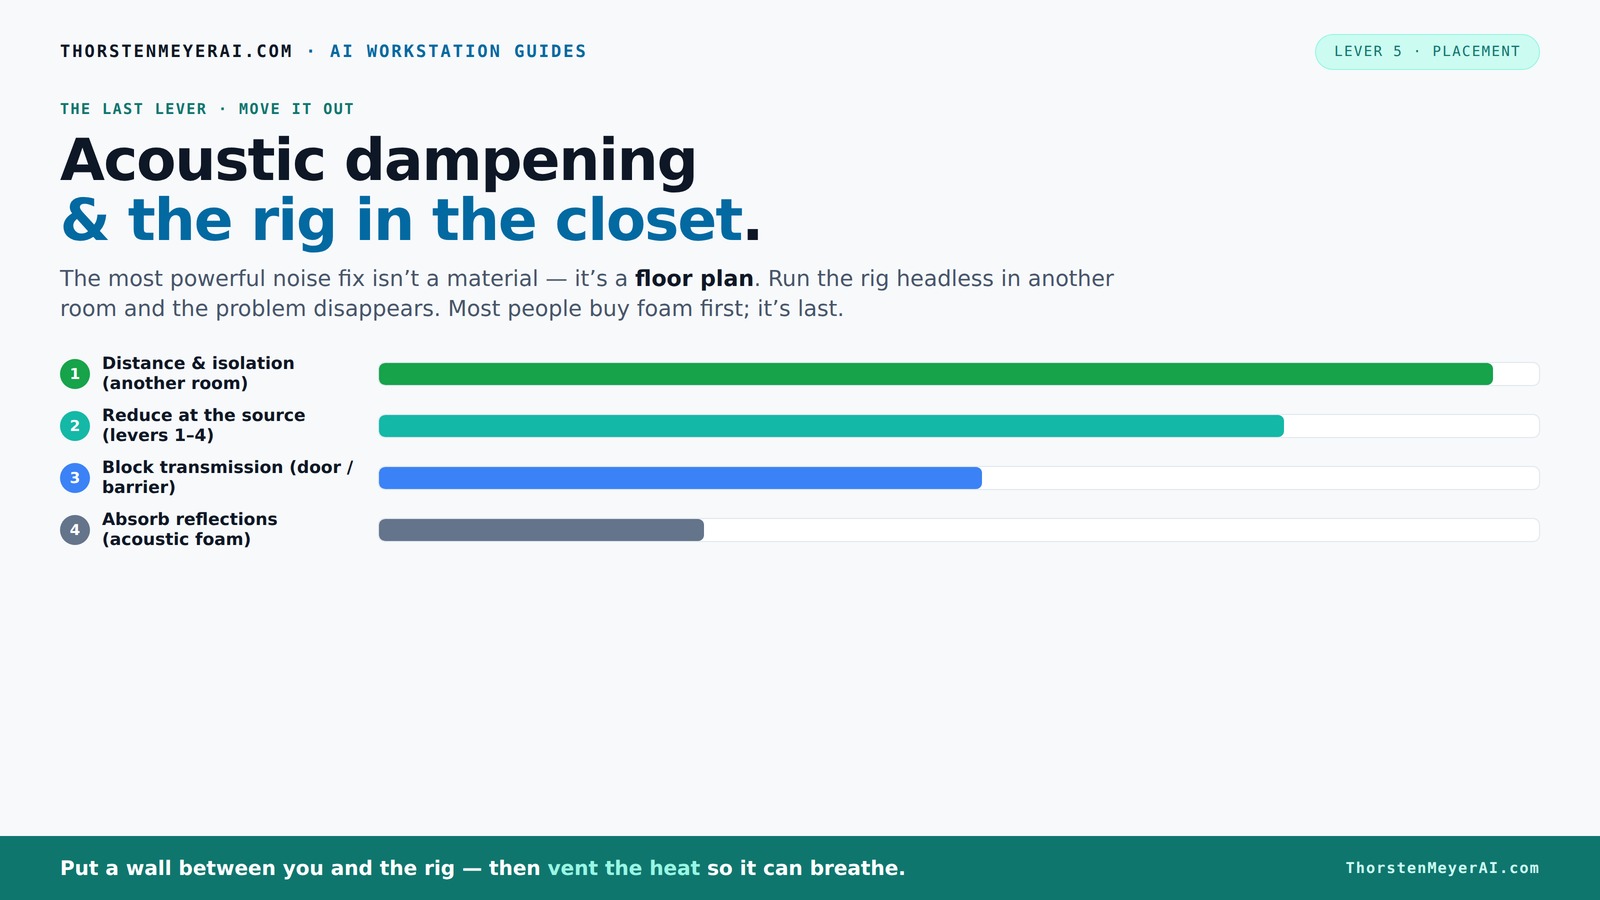
Acoustic dampening
& the rig in the closet.
The most powerful noise fix isn’t a material — it’s a floor plan. A rig you can’t hear because it’s in another room beats any amount of foam. Tap the approaches in Part 1 to see what actually works.
(another room)
(levers 1–4)
(door / barrier)
(acoustic foam)
Contain the noise, not the heat
Key Takeaways
- Moving your rig into another room or closet is the most effective way to reduce noise.
- Proper ventilation and airflow are critical when placing high-power equipment in enclosed spaces.
- Understand the difference between damping (echo reduction) and soundproofing (sound leakage blocking).
- Target reflection points first when placing acoustic panels — not just covering all walls.
- Bass traps in corners can dramatically improve low-end clarity in small spaces.

Focusound 52 Pack Acoustic Foam Panels 1" x 12" x 12" Sound Proof Foam Panles Soundproofing Noise Cancelling Wedge Panels for Home Office Recoding Studio with 300PCS Double-Side Adhesive
Soundproofing - Acoustic foam panels triangular grooves structure for better noise absorption, helps to reduce and absorb unwanted...
As an affiliate, we earn on qualifying purchases.
As an affiliate, we earn on qualifying purchases.
Why Moving the Rig Beats Soundproofing: The Simple Truth
The most effective way to cut noise isn’t more foam — it’s distance. When your rig sits in another room, the noise drops dramatically. Think of it like a loud neighbor: the farther away, the quieter they seem. Discover more about noise reduction strategies.
For AI workstations, this means lean into network-based workflows: SSH, remote desktops, or API calls. Your machine can roar in a closet or basement, while your workspace stays silent. This simple shift often cuts 80% of noise problems instantly.
For example, I moved my GPU rig to a spare closet. The noise, once deafening, became barely audible from my desk — even without sealing or treatment.

Audimute Soundproofing Acoustic Door Seal Kit - Door Sweep and Seal - (Large Size)
Includes (2) Door Seals (3/16" x 1/2" x 50') and (1) Door Sweep (1/2" x 1.5" x 25').
As an affiliate, we earn on qualifying purchases.
As an affiliate, we earn on qualifying purchases.
The 'Rig in the Closet' Setup — How to Make It Work Without Cooking Your Hardware
Placing a high-power rig in a closet sounds perfect for noise reduction — until heat builds up. A sealed space traps heat, which can cook your hardware over time. The key is proper airflow.
Active ventilation is a must: add a quiet exhaust fan, or at least a passive vent that allows hot air to escape. Better still, a temperature-controlled ducted system ensures your rig stays cool while remaining quiet. See tips for effective closet ventilation.
For instance, I installed a small, whisper-quiet exhaust fan in my closet, paired with a vent duct. My GPU ran at 65°C instead of 80°C, and the noise dropped by half.
Focusound 52 Pack Acoustic Foam Panels 1" x 12" x 12" Sound Proof Foam Panles Soundproofing Noise Cancelling Wedge Panels for Home Office Recoding Studio with 300PCS Double-Side Adhesive
Soundproofing - Acoustic foam panels triangular grooves structure for better noise absorption, helps to reduce and absorb unwanted...
As an affiliate, we earn on qualifying purchases.
As an affiliate, we earn on qualifying purchases.
Acoustic Dampening vs. Soundproofing: Know the Difference to Fix Your Noise Problem
Acoustic dampening and soundproofing are often confused — but they serve different purposes. Dampening reduces echo and reflections inside a space, which can make recordings sound clearer and more professional. Soundproofing, on the other hand, aims to prevent sound from escaping or entering, which is crucial if you want to keep noise contained or prevent external noise from interfering.
Understanding this distinction is vital because choosing the wrong approach can lead to wasted effort. For internal echo issues, lightweight treatments like foam panels are effective but won't stop sound leakage. Conversely, heavy barriers and sealing gaps are necessary to prevent noise from escaping, but they don't necessarily improve internal sound quality. Learn more about soundproofing and dampening.
For example, adding thick blankets inside the closet can significantly reduce internal echo, making your recordings cleaner, but they won't stop your neighbors from hearing the noise outside. Sealing gaps around doors and adding mass to walls, like drywall or mass-loaded vinyl, can contain sound effectively, but may require more effort and space.

Pyle 12 Pack Acoustic Foam Panels, Audio Acoustic Sound Dampening, Soundproofing Noise Cancelling Wedge Panels, Pads for Studio, Recording Room, Vocal Booth Wall Foam Panel Kit - PSI1612.5
UNIVERSAL COMPATIBILITY: Includes 12 pieces of acoustic studio soundproofing isolator pads that are universally compatible and mountable to...
As an affiliate, we earn on qualifying purchases.
As an affiliate, we earn on qualifying purchases.
Placement Tips for Acoustic Treatment in a Small Closet
Where you put panels makes all the difference. Start by identifying your microphone position — then treat the reflection points around it. Proper placement ensures that your treatments are effective, targeting the specific areas where sound reflections cause issues. Find out about acoustic treatment placement.
Use a mirror trick: hold a mirror against the wall and see where reflections bounce to your mic. Place panels at these points to absorb those echoes. This targeted approach prevents unnecessary clutter and maximizes the impact of your treatment.
For example, I placed foam panels directly behind my vocal mic and on the wall facing me — dramatically reducing harshness and echo. This strategic placement optimized space and improved sound clarity without overloading the room.
Small spaces benefit from targeting corners with bass traps, especially if you notice boomy low-end buildup. Proper placement of bass traps in corners helps control low-frequency resonances that tend to accumulate in tight spaces, resulting in a more balanced and natural sound.
Do Bass Traps Matter in a Closet Booth? Yes, and Here’s Why
Bass traps are crucial when your space develops low-frequency issues — like a booming echo or standing waves. In tiny closets, bass buildup can make recordings muddy and harsh, especially with certain voices or instruments. Learn more about bass trap placement.
Installing bass traps in corners absorbs those problematic low-end waves, preventing them from resonating and creating uneven sound. They’re especially useful if your room feels “boomy,” or your microphone picks up excessive low frequencies, which can distort recordings and make mixing more difficult. Properly placed bass traps help achieve a clearer, more balanced tone, ensuring your recordings sound professional and natural.
How Much Wall Coverage Do You Really Need? The Right Balance
Covering every inch with foam isn’t necessary — targeted treatment works better and is more practical. Focus on reflection points and areas where sound bounces directly to your mic, as these are the critical spots where internal echoes are most problematic.
In small rooms, covering about 25-50% of the wall area with foam or panels is usually sufficient. Over-treating can reduce the sense of space and make the room feel cluttered or dead, which can affect your comfort and workflow. Striking the right balance ensures you get effective sound control without sacrificing room usability or aesthetics.
For example, I installed foam on the wall behind and beside my mic, leaving the ceiling and door mostly untreated. This selective treatment provided clear, controlled sound while maintaining an open, functional space.
Where to Put Treatment First — Door, Walls, or Corners?
Prioritize treating reflection points first — that’s where sound bounces directly to your mic or ears, causing comb filtering and harshness. Use a mirror to identify these points around your setup and place panels accordingly. Next, seal gaps around the door and windows to prevent noise leaks, which can be just as important in maintaining a quiet environment.
Corners are last — bass traps go there if low-end issues persist. Properly treating corners with bass traps can dramatically improve the clarity of low frequencies, especially in small spaces where bass buildup is common. Ceiling and floor treatment is often less critical unless you notice flutter echoes or excessive reverberation, which can be mitigated with minimal effort.
For instance, I focused on wall reflection points and sealing my closet door with weatherstripping — the difference was immediate, creating a more controlled acoustic environment that improved both recording and listening experience.
Can a Reflection Filter Replace Full Acoustic Treatment for Vocals?
A reflection filter is a handy tool, but it’s not a complete solution. It helps reduce harsh reflections close to the mic, which can improve vocal clarity and make recordings sound more professional by minimizing proximity effect and early reflections.
However, it won’t control room echo or low-frequency issues that can muddy recordings or make them sound distant. Combining it with room treatment, like foam panels or bass traps, produces the best results. This layered approach ensures that both immediate reflections and the overall room acoustics are addressed, leading to cleaner, more natural-sounding vocals.
For example, I used a reflection filter near my mic, but adding foam panels around the closet made my vocals sound professional without echo or background noise. The combination tackled both the close-proximity reflections and the room’s reverberation, giving a balanced sound.
Can You Make a Closet Booth Work Without Permanent Changes?
Yes. You can set up an effective temporary or semi-permanent closet booth with portable panels, blankets, and DIY traps. No drilling or construction needed. This flexibility is especially useful for testing ideas or for occasional use, allowing you to optimize your space without a major overhaul.
For example, hanging moving blankets from the ceiling and sealing gaps with weatherstripping creates a quick, effective vocal space that’s easy to dismantle. Adding some portable bass traps or foam panels can further improve sound quality without permanent modifications. This approach allows you to adapt your setup as needed, balancing convenience and performance for different projects.
This method is ideal when space is limited or when you need a flexible solution that can be moved or adjusted easily.
The Cheapest, Most Effective Setup for a Closet Rig
Start with a few key steps: move your rig into a room or closet, seal gaps around the door, add a reflection filter, and place foam at reflection points near the mic. These simple, affordable steps can significantly improve your sound environment.
Use a small fan for ventilation, and layer rugs or blankets on the floor for extra absorption. This simple kit can cut noise and echo by 70% or more at a fraction of high-end solutions, providing a practical balance of cost and effectiveness.
For example, I built my setup with just a handful of foam panels, a fan, and blankets, and I achieved professional-sounding recordings without breaking the bank. This approach demonstrates that good results don’t always require expensive equipment — strategic placement and treatment matter most.
Frequently Asked Questions
What’s the real difference between acoustic treatment and soundproofing?
Acoustic treatment reduces echo and reflections inside a space, making it sound clearer and more natural. Soundproofing blocks sound from escaping or entering, which is essential if you need to contain noise or prevent external sounds from interfering. Both serve different purposes: treatment improves how the sound behaves within the space, while soundproofing prevents sound from passing through walls or gaps. For optimal results, combining both approaches often yields the best outcome, especially in small, enclosed environments where internal echo and external noise are both issues.
Where should I place acoustic panels in my closet?
Start by identifying reflection points near your mic — typically the wall behind it and the opposite wall where reflections bounce. Use a mirror held against the wall to see where reflections hit your mic position and place panels there. Cover these points to absorb direct reflections, which cause harshness and comb filtering. Don’t neglect corners if bass buildup is an issue; bass traps placed in corners can significantly improve low-frequency response. Proper placement ensures that your treatments address the most problematic areas, maximizing their effectiveness without cluttering the space.
Are bass traps necessary in a tiny closet booth?
Yes, especially if you notice a boomy or muddy sound. Bass traps absorb low-frequency resonances and standing waves that tend to build up in small, enclosed spaces. Without them, recordings can sound hollow, and mixing becomes difficult because of uneven frequency response. Properly installed bass traps in the corners help achieve a more balanced and natural sound, making your recordings clearer and more professional. They’re a worthwhile investment, especially if your space is tight and you want to avoid low-end muddiness that can ruin otherwise good recordings.
Will foam panels stop noise from leaving the closet?
Not really. Foam panels are designed primarily to absorb internal reflections and reduce echo within the space, which improves sound quality for recordings and listening. They do little to block sound from escaping, so they are ineffective as a soundproofing measure. If your goal is to contain noise or prevent external noise from entering, you’ll need heavier barriers, sealing gaps around doors and windows, and adding mass to walls with materials like drywall or mass-loaded vinyl. Combining internal dampening with external soundproofing is the most effective strategy for a quiet, professional setup.
How much wall coverage do I really need?
About 25-50% of the wall area, focused on reflection points and near the mic, is usually enough for effective treatment. Over-treating can reduce the room’s liveliness and make it feel dead or uninviting, which can affect your workflow and comfort. Strategic placement of panels at key reflection points maximizes their impact while preserving space and maintaining a natural sound. The goal is to balance absorption and space, ensuring your setup is both acoustically effective and comfortable to use. In small rooms, less is often more; treat only where necessary to avoid clutter and maintain room usability.
Conclusion
The secret to a quiet, professional closet rig isn’t just foam — it’s smart placement, ventilation, and targeted treatment. Moving your gear out of sight and into a space you control makes the biggest difference, with minimal effort and cost.
Remember: the goal isn’t just silence, but controlling what you hear and what others hear. Think about where your sound travels, then treat those spots, and your closet can become a surprisingly effective studio — or quiet workstation — in no time.